Saturday, 16 April 2011
Birch Tapping Guide
The equipment:
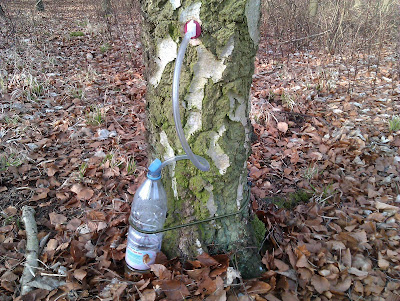
This is my birch tapping kit. It consists of a demijohn bung with hole available from Wilko or Tesco. Tap and tube are also from the wine making supplies in Tesco. The smallest portion of the bung is 27mm and the widest is 32mm. Because of this I bought a 30mm auger bit. Although this worked the bung went flush with the tree which was not what I was after. The auger to the right is a 28mm which should rectify the problem. All I did with the bit was take it to a local metal fabricator to have a piece cut off the drill end, and then have a piece of bar welded to the end to make a T handle. Although using this is hard work on the arms, it is compact which makes it ideal for a backpack. The bungee cord and bottle are self explanatory. Some use tape instead of a bungee to keep the bottle to the tree but I find the bungee is good as it is re-usable. If you need to tighten the bungee, place a twig between the bungee and tree and twist it like a tourniquet. The twig can then be stabbed into the ground to keep it in position. Once the tube is in the bottle and dripping, rest the bottle cap on top of the bottle opening to help keep out debris and insects.
How to tap that tree:
First, check that the sap is rising (early spring, around March) by sticking your knife in to the tree where you are intending to drill. You should see it run down the blade. Drill about 2ft from the ground by pushing and twisting the auger bit. The auger should pull itself into the wood but you will still need to apply some forward pressure. If there is a lean in the tree, drill in the underside so as to use gravity to help you. Drill in to the tree approximately 20mm deep (not including the bark). Place the bung tightly in the hole. Give the tube a suck and you will soon know if you have a tight seal. After a minute or so you should be getting a few drips coming down the pipe, put the pipe in the bottle and bungee it to the tree. Now it is just a waiting game, so leave it overnight to wake up to a great drink that beats tea any day.
A knife is also included in the pic as you don't always need to drill a hole to get the sap. The knife can be stabbed into the tree, levered slightly, and a small sharpened stick inserted to channel the sap into a bottle or mug below. Be careful which knife you use to lever into the tree- I broke the tip of a bland new No9 Opinel doing just this!
Repairing the damage:
Once you have got a litre or two of sap you need to look after the tree by plugging the gap, otherwise the tree can literally bleed to death. Do this by cutting a fresh piece of birch with a saw (I use a Laplander). Use your knife to taper down the end, and hammer it gently into the hole. Hopefully the sap should stop dripping, if it doesn't; you need a fatter stick. The limb you use MUST be freshly cut and shaved, and clean to avoid infecting the tree.
For the 2 minute of work it takes, birch tapping is a great way of getting a litre or two of fluid when you are camping. The birch sap will be a light brown/orange colour. There is no taste in the world as refreshing on a cold bright morning as a bottle of tree sap. Enjoy!
Subscribe to:
Post Comments (Atom)


No comments:
Post a Comment